Learning Git : Part 1
This is a two-part series to help you get started and advanced with version control systems and git. For any developer, git is an essential tool to learn.
Welcome to the three-part series on Git version control system.
This is part 1 of the series and we will be having a look at the version control systems, its importance, Git and various functionalities of git.
For Part 2, follow the link.
Topics to be covered in part 1:
Version control systems
Git: the most popular version control system
Git states
Starting a new project with git
Working with remote repositories
Let’s get started!
Version Control Systems
While working on a project, you might face a situation wherein you do not remember the changes you made when you worked last. This problem is amplified when a team is working on the project and you simply can’t keep a track of changes done by your team. Even worse, you might be stuck in a loop of creating a new version of your project even with minutes changes!
Version control comes to your rescue and it can help you in a number of ways:
It makes collaboration in a team easier
Helps you to keep a track of changes done to the project
It makes it possible to restore the older versions if required
Git: the most popular version control system
Git is a widely used version-control system for tracking changes in source code during software development. It is designed for coordinating work among programmers. Being a distributed system, every contributor has a copy of their code stack while working with others.
Github brings together the world's largest community of developers to discover, share, and build better software.
We will use Github as the platform to practice our learning.
Git states
Broadly speaking, there are three states in which your files can be: modified, staged and committed. It is crucial to understand these terms which will help in familiarizing yourself with the git environment
Modified: This refers to the state when you have made changes to the file but you have not committed the changes yet.
Staged: It means that you are ready to commit the changes you have made in your file, marked as modified.
Committed: It indicates that the data is stored in your local database.
Starting a new project with git
Let's Begin by Creating a Local Repository (Execute the command in a Cell) and simultaneously see how to “commit”, which is creating a snapshot of the entire state of the project at a moment. Github helps you create a remote repository.
Random trivia: Github has recently changed the name of “master” branch to “main” due to cultural sensitivity around slavery.
Git init
Git init#output
Initialized empty Git repository in D:/git_training/.git/>The Exclamation Mark ensures that the command is executed as a Terminal Command. The output shows that we have created a local Empty git repository.
Git status
We should be able to evaluate the status of the created repository using the "Status" command
Git statusThis would allow us to check the current status of our Repository at any point in time.
Let's add a New File to the Folder called "hello.txt" which has a sample text inside it.
Execute the following to see if Git has started tracking changes.
Git StatusThe Output should be something similar to this.
This is very informational. Let us evaluate each of the messages before proceeding further.
On branch master: It means that we are currently working on the master branch
No commits yet: We have not made any commits to the repository so far
Untracked files: This shows that git was able to find some files which are part of the folder that git is trying to track
Git Branch
A branch in Git is simply a lightweight movable pointer to one of these commits. The default branch name in Git is master (now main). As you initially make commits, you're given a master branch that points to the last commit you made. Every time you commit, it moves forward automatically.
Git Commit
Git Commit - Commits are created with the _git commit_ command to capture the state of a project at that point in time. The most recent state of the project is called HEAD.
Effectively we are trying to achieve the following workflow:
We will now add the files that are currently untracked.
Git add . Git statusWe will be adding the un-tracked listed above in our repository. Notice the "dot" at the end. This is to select all the files. Alternatively, file names can be specified.
The status has not changed to No Commits which specifies that changes are yet to be committed to the branch master.
Before we start committing Git needs to know who we are in order to maintain a name and email ID along with the commits. Execute the following before making a commit. This is a One Time Activity.
git config --global user.email "you@example.com"
git config --global user.name "Your Name"
Now, let's Commit
Git commit -m "Initial Commit"The hyphen m specifies the comment that should be added to commit. Consider it like a changelog that a user can maintain.
The following message confirms that 1 file was changed with 2 lines added into the Git version system. Furthermore, we can track Git Status which we have already learnt.
Working with remote repositories
Github allows you to create remote repositories which can move the project from local to a remote repository.
Git push
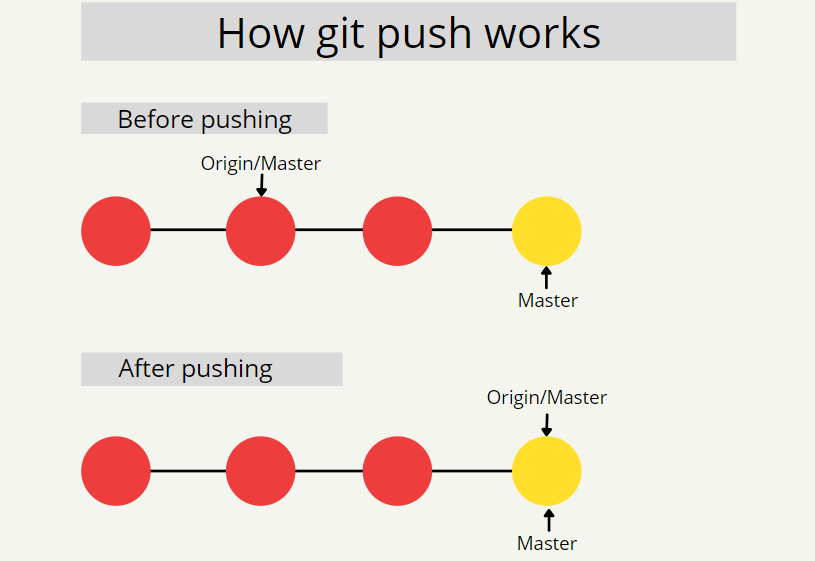
After you are done committing your code, it is time to populate your remote repository on Github. This can be done with Push command on git. If you are working on the master branch and pushing code to the origin repository, then:
git push origin masterGit pull
An easy way to copy an entire repository on a remote repository is to use git clone with the link to the repository on Github. If you would like to download content from a remote repository and match your remote repository to it, you can use git pull.
git pull origin masterYou would be accustomed to pull requests while working in teams. This helps to ensure that contribution by a member is done without affecting the entire workflow and it also acts as a system of check so that the original repository is not negatively impacted.
We hope you liked the first part of our series on Git. Let us know your feedback and also mention other topics that you would like us to cover.
For more, please follow the link to Part 2.


