


Learning Git: Part 2
This is a two-part series to help you get started and advanced with version control systems and git. For any developer, git is an essential tool to learn.
Welcome to part 2 of our series on Git. In part 1, we covered the basics of version control system, git and GitHub. Continuing the series, this part 2 of the series on git wherein we will discuss branching, merging and rebasing.
You can read Part 1 here
Topics to be covered in part 2:
Branching
Merging
Resolving merge conflicts
Conclusion
Branching
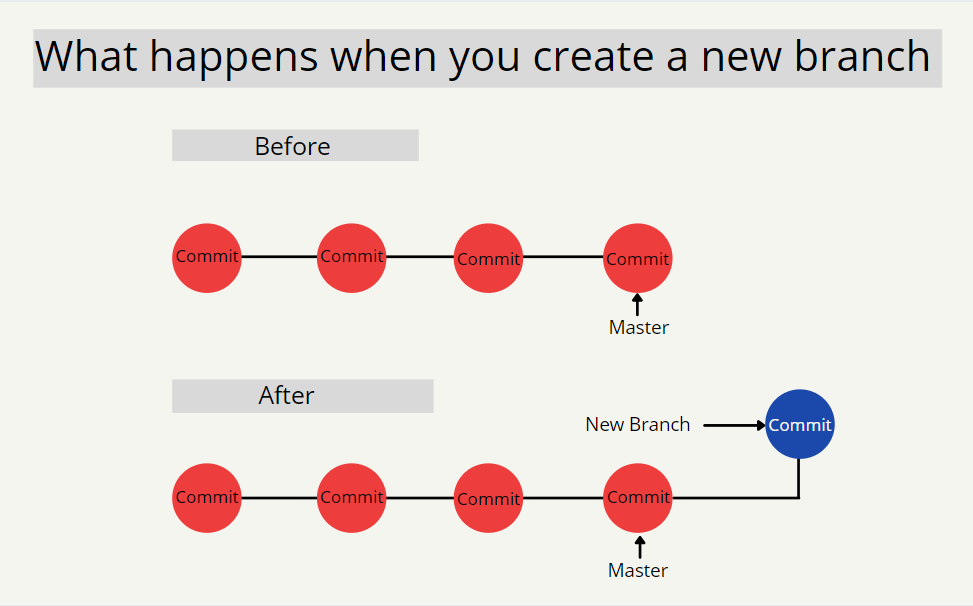
Branching is just a natural way to manage and maintain individual code in isolation and merge when ready to the master. This approach allows multiple people to work on the same code base and realize the changes once everyone is ready. This is naturally collaborative. In git, the default branch that you start with is called “master” branch.
Git Branch is a command to allow to work with branches.
Git branch --create devThis creates a new branch called dev. This is just a name and can be anything. Usually, branch names are tied to environments or feature or people depending on the Team's agreement. We can easily see the branches we have.
Git branch --list

I have created two branches dev & qa apart from master. The * denotes the current branch under selection/operation.
Let's do a Checkout
Git checkout
The git checkout command lets you navigate between the branches created by git branch . Checking out a branch updates the files in the working directory to match the version stored in that branch, and it tells Git to record all new commits on that branch.
git checkout dev#output Switched to branch 'dev'Let's make an edit to the file and check the status.

While this specifies that change was made to the file and it is not committed, It is difficult to understand the exact changes that were made.
Git Diff to the rescue.
Git diff
git diff is a multi-use Git command that when executed runs a diff function on Git data sources. These data sources can be commits, branches, files and more. ... The git diff command is often used along with git status and git log to analyze the current state of a Git repo.
Before we see that we should ensure that we have pGit logerformed the following operations to the current branch.
1. Git Add - To ensure the changes are added to the current branch.
2. Git Commit - To Ensure that changes are saved to the current branch.
We can execute the diff command now.
git diff dev..master
This describes every addition and deletion operation with the modified record.
To Summarize our actions so far. We have achieved the following :
Created an Empty Git Repository and added a file to it to track.
Created different branches
On Branch dev we have edited and saved the information that was changed.
The changes were evaluated using Git Diff command. >
Our Master is still behind by an update compared to dev branch. A handy command to use is Git Log
Git log
The Git Log tool allows you to view information about previous commits that have occurred in a project. The simplest version of the log command shows the commits that lead up to the state of the currently checked out branch. These commits are shown in reverse chronological order (the most recent commits first).
Let's fire it up.
git log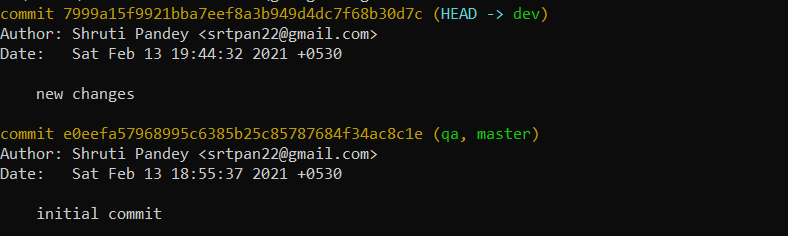
The Git Log provides quite a lot of information. It tells the user about the status of each branch along with the last commit messages which are timestamped to understand and select the right change.
These set of commands are extremely handy when working on Git and formulate the foundations of a Version Control System.
Merging
Merging is an idea where we take our independent feature/change and align it with the larger Code Life-cycle. This is foundational to Git as it ensures that though people operate in isolation the most updated version is always available for ready usage.

Introducing, Git Merge
Git merge
The git merge command lets you take the independent lines of development created by git branch and integrate them into a single branch. ... Again, this means that git merge is often used in conjunction with git checkout for selecting the current branch and git branch -d for deleting the obsolete target branch.
Let us start by switching to Master branch first.
git checkout masterSwitched to branch 'master'The Status should specify that master has no changes.
git status
Let's run the Git Merge
git merge dev
We have merged Dev Branch into Master. We can validate this the Git Log command
git log
The HEAD in the Git repo is pointing to master and dev both of which has the latest update. We can now delete the branch dev and continue our development for another feature.
Resolving merge conflicts
Merge conflicts might occur when the same line of code is edited or deleted in different branches of the project. This happens when one or more contributors are working on the same project. As a result of such action, git might be confused about which action to execute and it can result in a merge conflict.
Since git cannot resolve a conflict on its own, the developers will have to decide on which changes to keep and which to discard. To address this, it is important to check the logs of the actions and then prioritize action. After that, update the files which are causing the conflict. When the issue is resolved, commit the changes.
Conclusion
With this, we put a pause on our series on “Learn Git and version control” and continue our work on other series. Though there are other things to be covered before you can wear the cap of being a “Git expert”, but the content we provided is a good source to kickstart and ace your journey. We covered topics on version control systems, git and GitHub, remote repositories, branching, merging and resolving merge conflict.
Follow here for Part 3.
We hope you liked your work. It will be great if you can give us a heads up. Join us for more such content and stay updated!