


ML Deployment in Containers: Summary
Ready to deploy your machine learning model and can't choose from the options? Coming to the rescue is our series on ML Model deployment in Containers to help you navigate Dockers!
Here is a summary of the 3 parts of ‘ML Deployment in Containers’.
Links to all the parts:
Please do support us by subscribing

Part 1:
In Part 1, We learned about Containers and container terminologies that are used. A Container is a standard unit of software that packages up code and all its dependencies so the application runs quickly and reliably from one computing environment to another. Containers offer a logical packaging mechanism in which applications can be abstracted from the environment in which they actually run.
But why containers? Containers offer a logical packaging mechanism in which applications can be abstracted from the environment in which they actually run. This decoupling allows container-based applications to be deployed easily and consistently, regardless of whether the target environment is a private data center, the public cloud, or even a developer’s personal laptop.
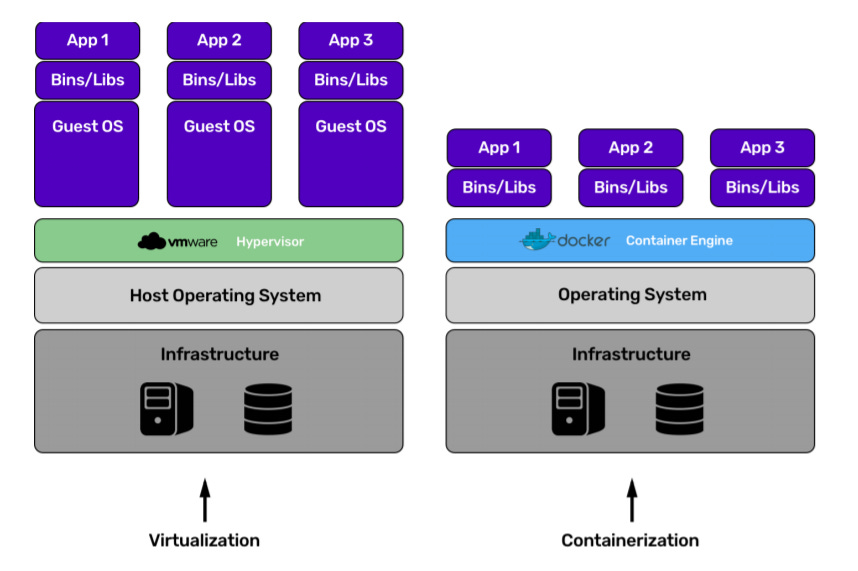
While Containerization is the process of taking the traditional virtualization to the next level that powers multiple applications on a single Operating System which are developed and run in their own containers. One of the biggest advantage that Containerization has over Virtualization is that everything runs on a single operating system which makes it safer and faster. It is also very shareable among the developers which is an added advantage. Refer to the above image.

Today Docker is one of the popular container engine technologies which serves the exact purpose as discussed above. Docker is an open platform for developing, shipping, and running applications. Docker enables you to separate your applications from your infrastructure so you can deliver software quickly. With Docker, you can manage your infrastructure in the same ways you manage your applications. In the image above are some of the basic terminologies used in Docker.
Do checkout the complete article for more.

Part 2
In Part 2, We saw how you can set up Docker on your machine and some basic commands to help you with it. To get your Docker up and running, first download and install Docker on your system. Depending on your Operating System, you can install and run Docker in your machine from this link: Install Docker
After you have installed it, open the Docker application, create your Docker ID and log in using the details. That’s it! Your Docker is ready to use. You can run these commands to verify your installation.
docker versiondocker run hello-worldHello-World is a very simple image. We can try and pull another image with which we can discuss various operations you can perform on the pulled image. To pull images from the registry use the below command
docker pull ubuntu
Now that we have the image, we can run the container:
docker run ubuntuThe container will be run. You can see the containers on your system by running the command:
docker ps -a
The image contains the following information:
CONTAINER ID: this shows the unique ID of each container
IMAGE: the image from which the container is created
COMMAND: command executed in the container while starting it
CREATED: the time the container was created
STATUS: the current status of the container
PORTS: if any of the container ports is connected to the host machine, it will be displayed here
NAMES: this is the name of a container. If it is not provided while creating the container, Docker provides a unique name by default.
Now that we have understood how to pull an image & get the details, Let’s understand how you can deploy your ML Model on Docker. First, we create a very simple Machine Learning model and save it as a pickle file in our system.
| from sklearn.datasets import load_iris | |
| from sklearn.model_selection import train_test_split | |
| from sklearn.neighbors import KNeighborsClassifier | |
| import numpy as np | |
| import pickle | |
| iris_dataset = load_iris() | |
| X_train, X_test, y_train, y_test = train_test_split(iris_dataset['data'], iris_dataset['target'], random_state=0) | |
| knn = KNeighborsClassifier(n_neighbors=1) | |
| knn.fit(X_train, y_train) | |
| X_new = np.array([[5, 2.9, 1, 0.2]]) | |
| prediction = knn.predict(X_new) | |
| y_pred = knn.predict(X_test) | |
| filename = 'iris_classification.pkl' | |
| pickle.dump(knn, open(filename, 'wb')) |
The next step is to create a web endpoint using Flask. For a more detailed tutorial, you can visit this article: Model as web endpoints
Your final flask application will look something like this:

After this, you need to download Docker Desktop, create a Docker ID and start working on your Docker File. After this create a docker file in the flask. You need not have to provide any extension to the file.
| FROM python:3.7 | |
| RUN pip install virtualenv | |
| ENV VIRTUAL_ENV=/venv | |
| RUN virtualenv venv -p python3 | |
| ENV PATH="VIRTUAL_ENV/bin:$PATH" | |
| WORKDIR /app | |
| ADD . /app | |
| # to install dependencies | |
| RUN pip install -r requirements.txt | |
| # to expose port | |
| EXPOSE 5000 | |
| # to run the application: | |
| CMD ["python", "app.py"] |
After this, create a repository on Microsoft Azure as we will be needing a registry. You can choose the AWS registry also. After creating the registry, you can create the Docker image by running this command in the folder which contains your project file:
docker build -t srtpan.azurecr.io/iris-classification:latestDecoding the command we have written above:
srtpan.azurecr.io is the name of the registry that you get when you create a resource on the Azure portal.
iris-classification is the name of the image and latest is the tag. This can be anything you want.
After this you can push the code to the registry with:
docker push srtpan.azurecr.io/iris-classification:latest Now you can access your application on the Azure portal.
Congratulations on deploying your ML Model on docker!

Part 3
In Part 3, We saw Kubernetes, its components and hands-on. Kubernetes is a portable, extensible, open-source platform for managing containerized workloads and services, that facilitates both declarative configuration and automation. It has a large, rapidly growing ecosystem. Kubernetes services, support, and tools are widely available.
The deployment of Kubernetes is done in form of “Clusters”.
A Kubernetes cluster consists comprise worker machines, called “Nodes”, that run containerized applications. Every cluster has at least one worker node.
The worker nodes host the “Pods” that are the components of the application workload. The control plane manages the worker nodes and the Pods in the cluster.
Here's the diagram of a Kubernetes cluster with all the components tied together.

The “API server” is a component of the Kubernetes control plane that exposes the Kubernetes API. The API server is the front end for the Kubernetes control plane.
“Control plane” component that watches for newly created Pods with no assigned node, and selects a node for them to run on. This is done with help of Kube Scheduler.
Control Plane component that runs controller processes. “Kube Controller Manager” is used for the process.
Running Kubernetes on your Machine
In the following paragraphs, we will introduce how to run Kubernetes on your local device and make the most of Kubernetes.
Step 1: Create Kubernetes cluster
Before creating the cluster, it is required that you install Kubernetes on your local machine.
If you’re using macOS:
brew install minikubeIf you on a Windows Machine, install or update the Windows package manager and then run the following command on your command prompt:
winget install minikubeConfirm that your Minikube has been installed by running this command:
minikube versionTo start a cluster, run the command:
minikube startAfter running this command, you will get the output:

When we executed the minikube start command, it created a new VM based on the Minikube image. That image contains a few binaries. It has both Docker and rkt container engines as well as localkube library.
You can check the status of your cluster by running:
minikube statusStep 2: Use kubectl to Create a Deployment
Once you have a running Kubernetes cluster, you can deploy your containerized applications on top of it. To do so, we need to create a Kubernetes Deployment configuration. To enable deploying your app in Kubernetes, you need to install kubectl in your system which is the command line for Kubernetes.
Check the version of Kubectl to confirm if it is installed on your machine. After that, let’s try to deploy the app in Kubernetes.
This can be done with the kubectl create deployment command. We need to provide the deployment name and app image location. Make sure to include the full repository URL for images hosted outside the Docker hub.

Step 3: Explore the deployed app
Our app has been deployed and now let’s verify that the application we deployed in the previous scenario is running. We’ll use the following and look for existing Pods:
kubectl get commandNext up, to view what containers are inside that Pod and what images are used to build those containers we run the below command:
describe podsStep 4: Use a Service to Expose Your App
A Service routes traffic across a set of Pods. Services are the abstraction that allows pods to die and replicate in Kubernetes without impacting your application.
Let’s verify that our application is running.
kubectl get podsIf you confirm that your pods are running, then you can see the list of the current Services from our cluster:
kubectl get services
Now, create an environment variable called NODE_PORT that has the value of the Node port assigned.
export NODE_PORT=$(kubectl get services/kubernetes-bootcamp -o go-template='{{(index .spec.ports 0).nodePort}}') echo NODE_PORT=$NODE_PORT The Deployment created automatically a label for our Pod. With the given command, you can see the name of the label.
kubectl describe deployment With this, your app has been exposed!

This was all about until Part 3, We’ll cover more on Kubernetes in Part 4. till then stay tuned!
Do share, subscribe and support Coffee and Engineering!