ML deployment in containers: Part 3
Ready to deploy your machine learning model and can't choose from the options? Coming to the rescue is our article on ML Model deployment in Containers to help you navigate Kubernetes!
Taking Machine learning models to production is the ultimate aim. Making a software system available for use is called deployment. Scalability is the property of the system to handle a growing amount of work by adding resources to the system.
At Cafe I/O, we have been publishing content on various options to deploy your Machine Learning model. We have already discussed:
This is Part 3 of our series on ML Model deployment in Containers.
Links to all the parts:
In part 1 of our series on ML model deployment in Containers, we introduced containers, compared virtualization and containerization, discussed Docker and Container orchestration.
In part 2, we saw the hands-on deployment of an ML Model on Docker and understood Container Orchestration.
In the part 3, we will cover:
A gentle introduction to Kubernetes
Components of Kubernetes
Running Kubernetes on your Machine
Conclusion
If you like our writing, do encourage us by Subscribing and Sharing
Kubernetes — A gentle introduction
In the previous articles, we have seen various deployment methods and this series focuses on containers. We started by discussing the requirement for container-based deployment and did some hands-on docker in our last article.
However, knowing and running containers is not the full picture.
Containers are to be made scalable, fault-tolerant and needs transparent communication across the cluster. Containers are only a small element of the large picture and require some tool to manage them. Such tools are called “Container Scheduler”. They help in interacting with Containers and managing them.
One such scheduler is Kubernetes.
Kubernetes is a portable, extensible, open-source platform for managing containerized workloads and services, that facilitates both declarative configuration and automation. It has a large, rapidly growing ecosystem. Kubernetes services, support, and tools are widely available.
The name Kubernetes originates from Greek, meaning helmsman or pilot. Google open-sourced the Kubernetes project in 2014. Kubernetes combines over 15 years of Google's experience running production workloads at scale with best-of-breed ideas and practices from the community.
Orchestration Engines like Kubernetes have the following advantages:
It makes sure that resources are used efficiently and within constraints.
It makes sure that services are up and running.
It provides quite a high fault tolerance and high availability.
It makes sure that the specified number of replicas are deployed.
It makes sure that the desired state requirement of a service or a node is (almost) always fulfilled.
Components of Kubernetes
The deployment of Kubernetes is done in form of “Clusters”.
A Kubernetes cluster consists comprise worker machines, called “Nodes”, that run containerized applications.
Every cluster has at least one worker node.
The worker nodes host the “Pods” that are the components of the application workload. The control plane manages the worker nodes and the Pods in the cluster.
In production environments, the control plane usually runs across multiple computers and a cluster usually runs multiple nodes, providing fault-tolerance and high availability.
Here's the diagram of a Kubernetes cluster with all the components tied together.
The “API server” is a component of the Kubernetes control plane that exposes the Kubernetes API. The API server is the front end for the Kubernetes control plane.
“Control plane” component that watches for newly created Pods with no assigned node, and selects a node for them to run on. This is done with help of Kube Scheduler.
Control Plane component that runs controller processes. “Kube Controller Manager” is used for the process.
Logically, each controller is a separate process, but to reduce complexity, they are all compiled into a single binary and run in a single process.
Running Kubernetes on your Machine
In the following paragraphs, we will introduce how to run Kubernetes on your local device and make the most of Kubernetes.
Step 1: Create Kubernetes cluster
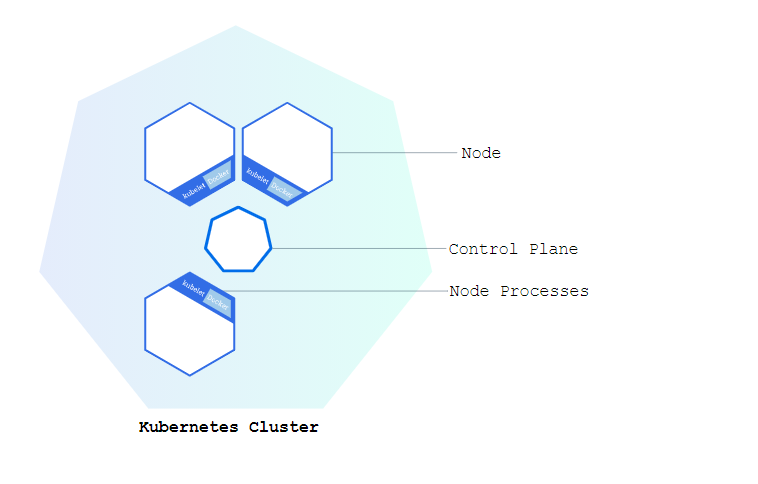
We have discussed above what Kubernetes cluster mean. A Kubernetes cluster consists of two types of resources:
The Control Plane coordinates the cluster
Nodes are the workers that run applications
To represent it graphically:
Before creating the cluster, it is required that you install Kubernetes on your local machine.
If you’re using macOS:
brew install minikubeIf you on a Windows Machine, install or update the Windows package manager and then run the following command on your command prompt:
winget install minikubeConfirm that your Minikube has been installed by running this command:
minikube versionTo start a cluster, run the command:
minikube startAfter running this command, you will get the output:
When we executed the minikube start command, it created a new VM based on the Minikube image. That image contains a few binaries. It has both Docker and rkt container engines as well as localkube library.
You can check the status of your cluster by running:
minikube statusStep 2: Use kubectl to Create a Deployment
Once you have a running Kubernetes cluster, you can deploy your containerized applications on top of it. To do so, we need to create a Kubernetes Deployment configuration.
For a better understanding, it will look something like this:
To enable deploying your app in Kubernetes, you need to install kubectl in your system which is the command line for Kubernetes.
Check the version of Kubectl to confirm if it is installed on your machine. After that, let’s try to deploy the app in Kubernetes.
This can be done with the kubectl create deployment command. We need to provide the deployment name and app image location. Make sure to include the full repository URL for images hosted outside the Docker hub.
In the above-mentioned code, these things happened:
Minikube searched for a suitable node where an instance of the application could be run
It scheduled the application to run on that node
It configured the cluster to reschedule the instance on a new Node when needed
Step 3: Explore the deployed app
Our app has been deployed and now let’s verify that the application we deployed in the previous scenario is running. We’ll use the following and look for existing Pods:
kubectl get commandNext up, to view what containers are inside that Pod and what images are used to build those containers we run the below command:
describe podsStep 4: Use a Service to Expose Your App
A Service routes traffic across a set of Pods. Services are the abstraction that allows pods to die and replicate in Kubernetes without impacting your application.
Let’s verify that our application is running.
kubectl get podsIf you confirm that your pods are running, then you can see the list of the current Services from our cluster:
kubectl get servicesNow, create an environment variable called NODE_PORT that has the value of the Node port assigned.
export NODE_PORT=$(kubectl get services/kubernetes-bootcamp -o go-template='{{(index .spec.ports 0).nodePort}}') echo NODE_PORT=$NODE_PORT The Deployment created automatically a label for our Pod. With the given command, you can see the name of the label.
kubectl describe deployment With this, your app has been exposed!
Conclusion
Containers hold the power to change how effective machine learning models are used by end-users by deploying them safely and making them fast. They also help in resource optimization. To acquaint you with containers, we introduced a series on ML model deployment in Containers
In part 1 of our series, we introduced containers, compared virtualization and containerization discussed Docker and Container orchestration.
In part 2, we saw the hands-on deployment of an ML Model on Docker and understood Container Orchestration.
In part 3, we understood Kubernetes in depth
Do share, subscribe and support Coffee and Engineering!


